Easy Cake Decorations with Frosting Transfers
You won't believe how easy it is to make cake decorations. All you need is a printed image, and can make an Easy Cake Decorating with Frosting Transfers.
Servings: 1 transfer
Ingredients
- - A printed out image or coloring page that will fit the size of your cake.
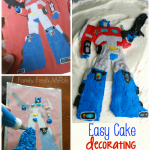
- NOTE: your image will be reversed when placed on the cake so if you are using words, you will need a mirror image. of the print out. This isn't an issue with images (see transformer collage above)
- - A small piece of glass such as a small picture frame glass
- - wax paper
- - buttercream frosting made with butter this is a MUST. When you freeze the transfer, what makes it harden and form is the butter
- - food coloring
- - pipping bags & frosting tips or ziplock bags with tips cut off
Instructions
- Start by trimming your image, and tape it to the back side of a flat piece of glass. We used the glass from a small picture frame. Tape the same sized piece of wax paper to the front of the glass. You should now have an image/glass/wax paper "sandwich."
- Next mix the colors you need for your image and fill your frosting bags. If you don't have frosting bags, you can also use ziplock bags with the tiniest part of the corner cut off. Here is a recipe for Buttercream Frosting if need one :)
- Now the fun part! Trace over areas that you want to see on your finished product. This bottom layer is going to be the what you see on top of your transfer. So you you have to carefully think one step at a time, which layer you want to put on next. Make sure to color in all the areas with the icing layers to a depth of about 1/4 inch, making sure your whole design is supported by that 1/4" thickness of icing.
- So as you can see in my steps below, I wanted the little button on the Transformer to pop out in the front, so I did those first. The solid blue of the Transformer's main leg should appear behind the buttons, so I did that last. Remember, the part you are going to see on the cake it the bottom layer, so you don't have to worry about the lumpy backside of the frosting.