How to Make Cake Pops
 My great friends Pat & Scott wanted to give cake pops a try for Easter. I had most of the supplies already since I have also been dying to try these cuties. So now was a perfect time to give these a whirl!
The cake pops are SUPER yummy and the basic pop is very easy to make. The most difficult part is waiting for the chocolate coating to dry & any intricate decorating you wish to do. And I do have to say this…. it was much more fun the second time around, making them with friends 🙂
Thank you friends for getting my butt in gear to make these 🙂
How to Make Cake Pops
- Prepare cake mix according to the package. Bake cake according to package using any listed pan and baking times.
- When cake is done, let it cool… a long time. 1-2 hours will be good. Once it is cool, crumble the cake up and put back into mixing bowl.
- Put 1/2 of your 16oz container of frosting into the mix. Stir until all frosting is evenly mixed in. At this point, I refrigerated my cake mixture for about 20 mins to make it easier to work with.

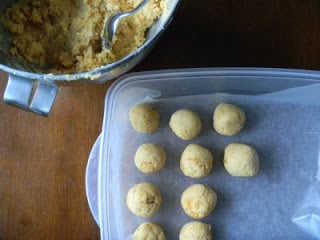
- Next you are going to roll out your balls 🙂 I found that a spoon scooped up about the right amount to make a perfect sized ball. Roll balls out with your hands and place on a wax paper.
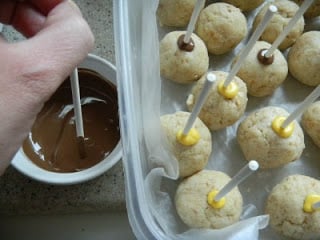
- Take a handful of candy/chocolate wafers and melt according to package. Next, take your candy sticks and dip into melted candy before inserting into the balls. As the candy coating cools, this will form a seal, keeping the stick in place. After all the sticks are placed, put your balls in the freezer or fridge for at least an hour.
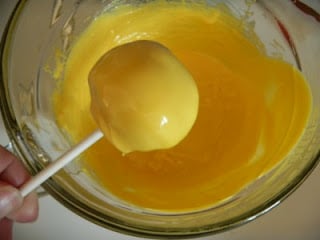
- It’s dipping time! Melt your chosen wafers in a deep bowl. For coating the balls, I found it easiest to swirl the ball in the coating, then to spoon some extra over the bottom to completely cover the stick. Hold coated ball over the bowl and continue to turn and drip off any extra candy coating. This takes some time… so be patient.
- Place your sticks upright to cool and harden. The best thing to use is a block of foam. But since I didn’t have any on hand, I just punched holes through an oatmeal box.
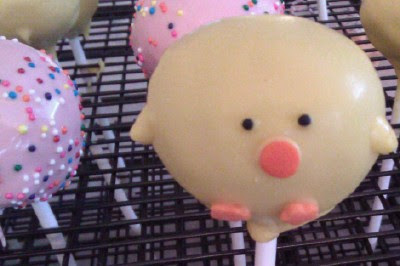
- Your balls will dry quickly, about 10-15 mins. Then if you want.. it’s time to decorate. There are so many possibilities.
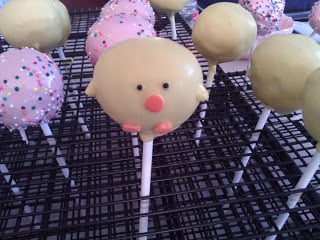
- We found these chicks online and knew they would rock for Easter 🙂 Pat loves sprinkles…. so we made pretty pink ones with tons of sprinkles. The options really are endless. So have fun!!!
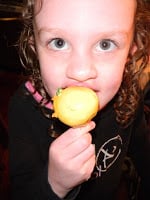
- MMMMMMM Cake pops are goooooooood! Happy Easter!


Cake Pops
Email this recipe!
Get this recipe emailed straight to your inbox!
Ingredients
- - cake mix and ingredients needed per directions on package. eggs, oil, water, ect...
- - 1 16 oz can of ready made frosting
- - lollipop sticks
- - candy melting wafers
- - food coloring
Instructions
- Prepare cake mix according to the package. Bake cake according to package using any listed pan and baking times.
- When cake is done, let it cool... a long time. 1-2 hours will be good. Once it is cool, crumble the cake up and put back into mixing bowl.
- Put 1/2 of your 16oz container of frosting into the mix. Stir until all frosting is evenly mixed in. At this point, I refrigerated my cake mixture for about 20 mins to make it easier to work with.
- Next you are going to roll out your balls 🙂 I found that a spoon scooped up about the right amount to make a perfect sized ball. Roll balls out with your hands and place on a wax paper.
- Take a handful of candy/chocolate wafers and melt according to package. Next, take your candy sticks and dip into melted candy before inserting into the balls. As the candy coating cools, this will form a seal, keeping the stick in place. After all the sticks are placed, put your balls in the freezer or fridge for at least an hour.
- It's dipping time! Melt your chosen wafers in a deep bowl. For coating the balls, I found it easiest to swirl the ball in the coating, then to spoon some extra over the bottom to completely cover the stick. Hold coated ball over the bowl and continue to turn and drip off any extra candy coating. This takes some time... so be patient.
- Place your sticks upright to cool and harden. The best thing to use is a block of foam. But since I didn't have any on hand, I just punched holes through a oatmeal box.
Nutritional Disclaimer: Family Fresh Meals is not a dietician or nutritionist, and any nutritional information shared is only an estimate. We recommend running the ingredients through an online nutritional calculator if you need to verify any information.
Did You Make This Recipe?
Make sure to share it with me below!
Originally posted April 2011
Post updated May 2020
Email Me This Recipe!
Need to save time? Have this article emailed straight to your inbox + sign up for all the latest recipes!