

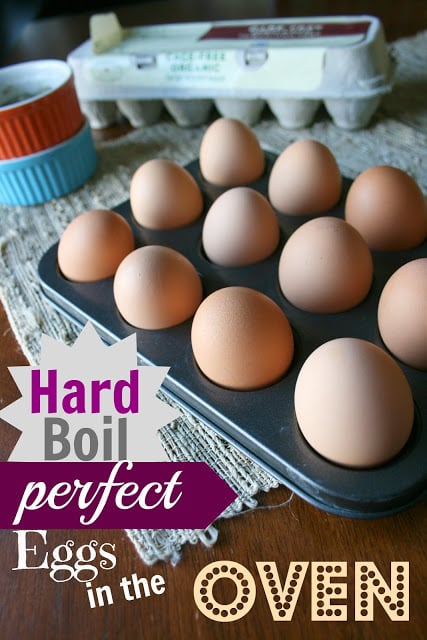
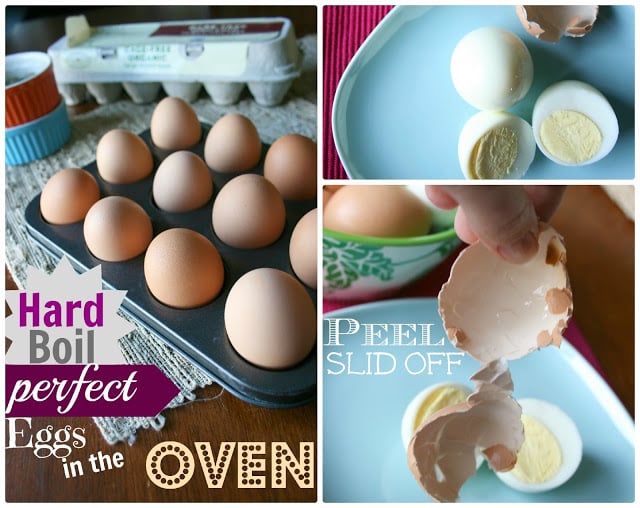
How to Make PERFECT Hard Boiled Eggs in the Oven

I love hard boiled eggs.
Why don’t I make them all the time? Well, the thought of getting a big old pot of water boiling, and then timing the boiling, flame on, flame off, lid on , lid off…. UGH!
Half the time I end up timing something wrong, and end up with over cooked, hard to peel eggs. OMG…. peeling hard boiled eggs is the pits!So when I kept seeing the idea on Pinterest, of hard boiling eggs in the oven, I HAD to give it a try.
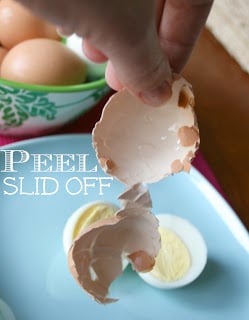
Ok people. This is a game changer. Eggs go in the oven for 30 minutes, then in a bowl of ice water to cool. That’s IT! You wanna know the BEST part? The peel practically slides off in one piece. I kid you not!
Email Me This Recipe!
Need to save time? Have this article emailed straight to your inbox + sign up for all the latest recipes!
Easy peel hard boiled eggs = the best thing ever.
Looking for an Instant Pot Hard Boiled Egg Recipe? I have one here!
Here is what you do.
PLEASE DO A TEST RUN with a couple eggs until you figure out the correct cooking temp for your oven.
How to Make PERFECT Hard Boiled Eggs in the Oven
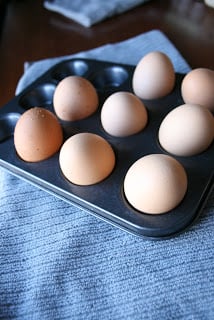
- Preheat your oven to 325 degrees F. If you know your oven runs cooler, try 350 temp. Place eggs in a muffin tin to prevent them from rolling around. Cook for 30 minutes.

- After the 30 minutes, remove eggs from the oven and place in a bowl of ice water to stop the cooking process. I left them in there for about 10 minutes.

- That’s it! Perfect eggs every time. I have cooked about 4 dozen so far and have had success with EVERY batch. Not an egg lover? Make sure to pin this one for Easter time.. it will be a life saver for coloring eggs 🙂


How to Make PERFECT Hard Boiled Eggs in the Oven
Email this recipe!
Get this recipe emailed straight to your inbox!
Ingredients
- Dozen eggs
Instructions
- Preheat your oven to 325. Some of the posts I found said between 325-350. My eggs turned out perfect at 325. If you know your oven runs cooler, try out a higher temp. Otherwise, go for the 325.
- Place eggs in a muffin tin to prevent them from rolling around.
- Cook for 30 minutes.
- After the 30 minutes, remove eggs from the oven and place in a bowl of ice water to stop the cooking process.I left them in there for about 10 minutes.
Nutrition
Nutritional Disclaimer: Family Fresh Meals is not a dietician or nutritionist, and any nutritional information shared is only an estimate. We recommend running the ingredients through an online nutritional calculator if you need to verify any information.
Did You Make This Recipe?
Make sure to share it with me below!


Shut Up!! I can’t believe this, so cool! I always makign hard boiled eggs, but never baked them. I am sooooooo doing htis tonight, I can’t wait to see how it turns out!
I know! I can’t believe it worked so well 🙂 I will be making hard boiled eggs much more now 🙂
Hi! I just tried this and it did cook the eggs fine. However, all three of the eggs I tried this with had two brown spots on the white of the egg… Almost like burn marks. Has this happened to you? Did you bake eggs taken right from the refrigerator or were they at room temp?
Thank you,
Angeline
the same thing happened to me, Angeline. I may try putting them directly on the oven rack next time to see if it happens again that way
Ummm… I guess I’m a perfectionist. I just figured out a way to prevent the brown marks, even though they’re not THAT big a deal (or so I tell myself). Take a cotton ball and pull at it until it makes a “nest” about the size of the mini-muffin cup; line each cup with a cotton ball, then set the egg (fat end down) in the cotton nest. The idea is to prevent any portion of the eggshell from actually touching the cup. Bake as appropriate for your oven. I LOVE this method of hard-cooking eggs. I get fresh, fresh, fresh eggs straight from my husband’s ranch – I know the warnings but have never had a problem – and I can’t believe how easily these peel after 10 min. in the ice water bath. Never had that result when boiling eggs, I always lost half the white trying to peel them. This method produces creamy eggs with bright, beautiful yolks!
Great minds all work together!!!!! Saw your idea with lining muffin tin with cotton balls. I used the little square/round cotton makeup removal pads. you can put as many or few as YOU want. (I for about them and they turned into flame boiled eggs) not really, just a little kitchen humor.
I cooked 4 eggs yesterday and it worked fine. Yes, there was a little brown spot or two, but fine. Today I cooked 6 more eggs with the cotton ball lining. Unfortunately the eggs didn’t fully cook in the 30 min. One third of the egg white was still somewhat liquid and the egg yolk was not fully cooked either. Maybe my cotton balls were still too thick even though I flattened them by pulling and spreading out the fibers. Next time I will just go with the original method.
P.S. I do love cooking them in the oven. So much less trouble than the boiling water method.
Just tried Bill’s idea using cotton make-up remover rounds. Worked perfect!!! Reuseable too.
I did this last night with 6 eggs in my toaster oven. A blog from a different site for toaster ovens. The eggs turned out great. Yes, there are little brown marks where the eggs sit on the rack (no muffin pan!). Those little marks don’t take away from the taste of the egg. They won’t hurt you. And the eggs I’ve peeled so far have been fully cooked.
What level do u put the rack?
I usually have mine on the middle rack.
About the brown spots, some eggs get the brown spots, this is not a big deal as you don’t eat the shells. They should disappear when you put then in the cold water.
I’m very anxious to try this! I notice that the photos show a mini muffin pan and I’m wondering if that makes the difference why the blogger hasn’t had the problem with the dark spots? Also wondering if a silicone muffin pan would eliminate the hot spots completely?? I appreciate the creative ideas like using paper baking vup liners too. Cooks are the best people! Can’t wait to try this! Thanks for this excellent idea!
About the brown spots!
Just use silicone muffin tins….No spots!!!!!!!!
I have been doing eggs like this for awhile and always had the brown spots as well. I just picked them off. However, I read somewhere to crumple up aluminum foil and put in the bottom of each muffin tin opening. That works really well to eliminate the spots and I just keep the same small wads of foil to use over again for this rather than having to make new ones each time. Alton Brown eliminates the spots by wetting a cotton towel and placing it in a cold oven, putting as many eggs as you would want and then turning on the oven. He has a video showing this. I tried his method but it scorched my towel and I am afraid I will set my kitchen on fire doing this. Good luck. I will NEVER go back to boiling eggs on the stove!
P.S. I always use room temperature eggs. Also, I never use fresh eggs straight from the store, Older eggs always peel better.
Great tip Nelda!
I actually never thought of the cotton idea, but i do use small bits of tin foil and make a nest that way .. works great every time. as a matter of fact i am making some now …. yummy!
use a silicon cup cake pan. no burn spots.
I put them in cupcake liners and they don’t brown!
Oh my I ruined a dozen or more eggs today until I came across this site. I did it in a reg muffin tin with cupcake wrappers and it saved me. They came out perfectly! Thanks soooo much…
I am so glad Gloria! Thanks for stopping by! XO
How many wrappers did you use per egg in each cup?
I have the rubber muffin wrappers. No need for muffin pan. These things are firm and stand up even when full.
I just spray the inside of each rubber wrapper with no stick spray, break the egg into each one and through the shell away. 20 minutes at 350 and I get perfect muffin shaped baked eggs. I prefer these over hard boiled eggs because I am not dealing with pealing them, I can sprinkle with what ever seasoning and have it bake into the top. I like Parmesan cheese topped baked eggs smothered in Hollandaise sauce on top of any kind of toasted bread, even tortilas
You do not have to have that pan. Just place them on your cooking racks. They won’t roll. You do not have to go out and buy a pan for them.
Joyce, you don’t have to buy a special pan. Any cupcake pan will do.
Aaaah, thank you. I tried the Alton Brown version with a wet towel, and twice now, have ruined a towel. I don’t know what magical towels he’s using that don’t get absolutely scorched after 30 minutes in the oven, no matter how much you wet it. I’m on paleo diet now, and much prefer boiled/ baked whole eggs to scrambled or fried. Will totally go put eggs in my muffin tin later!
I am going to try this for Dying Easter eggs, can anyone tell me if they crack when putting them straight from the oven into ice water? I don’t like dying cracked eggs!
Mine didn’t crack! When I boil them I always lose a few but when baking them I didn’t crack a single one.
do you put water in the pan?
Nope 🙂
I believe in Germany they put the eggs in an ovenproof dish full of salt. When they are done they just serve them still in the dish of salt and that helps to keep them warm. If you want them cold, then use the ice water. Enjoy!
Are the eggs room temp when put in the muffin tins or directly from fridge?
I’ve been wanting to try this since I saw it on Pinterest. Was waiting till someone I “know” try it out to make sure it worked. Thanks!
Haha. I know! I was doing the same thing, but no one was trying it…. so I thought, why not! I am so glad I did!!
Amazing! I can’t wait to try this.
You won’t be disappointed 🙂
Wow! looks like a winner!
It totally is! YUM!
I’ve been wanting to try this! But… well, you know how temperamental my oven is 🙂 Love that the shell comes off so easily!
hahaha.. yes. I would be scared of your oven 🙂